RESX files
The easiest way to provide localized messages in DotVVM applications are the .NET resource files.
Resource binding
You can use the resource binding to reference localized entries from REST files. The default syntax is {resource: FullNamespace.ResourceClass.ResourceKey}. This will find the appropriate RESX file and use the value with the specified key.
For example, if you have a project named MyWebApp and you have a Resources\Web\Strings.resx file in the project, the resource class will
be MyWebApp.Resources.Web.Strings (provided you haven't change the default namespace in the project properties).
To retrieve the resource, you need to use the following expression:
<dot:Button Text="{resource: MyWebApp.Resources.Web.Strings.SomeResourceKey}" />
In order to simplify the expressions, you can import the namespace using the @import directive:
@import MyWebApp.Resources.Web
...
<dot:Button Text="{resource: Strings.SomeResourceKey}" />
Create a RESX file
There should always be a language-neutral resource file with entries in the default language. The other languages should have the language-specific RESX files located in the same folder:
Resources/Web/Strings.resx          # language-neutral resource with default language
Resources/Web/Strings.cs-CZ.resx    # cs-CZ localization
Resources/Web/Strings.en-US.resx    # en-US localization
In order to access the RESX file entries, they must be generated as public members. Make sure that you have set the Access Modifier field to Public in the language-neutral RESX file.

The public member generation should be enabled only on the language-neutral resource file. The language-specific files don't need it since they don't generate a C# class.
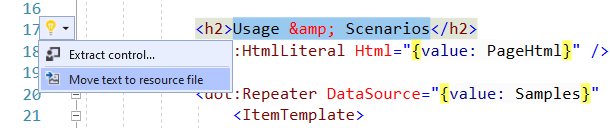
Extract texts to RESX files
The commercial edition of DotVVM for Visual Studio includes a simple way to extract texts from pages to RESX files. This feature can save a lot of time when localizing larger applications.