Markup controls with code-behind
DotVVM allows adding a code-behind class to markup controls, in a way combining markup with code control. Code-behind class is a way to add extra logic to markup controls.
In previous DotVVM versions, code-behind was necessary to define properties of markup controls. We recommend migrating those controls to the
@propertydirective, only using code-behind for controls which need extra logic.
In general, we recommend avoiding code-behind completely, moving logic to view models or other code-only controls. However, there is nothing technically work from code-behind, it is just our current architectural preference.
Create markup control with code-behind
You can create a markup control using the Add > New Item in the Solution Explorer context menu, and after you choose the name of the control, click on the checkbox which generates the code behind file for you.
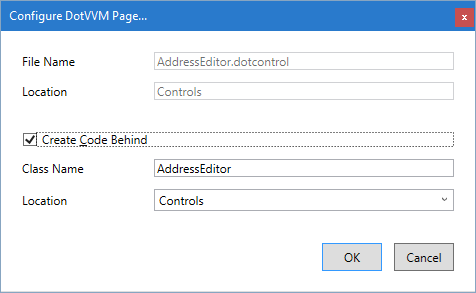
The code behind file AddressEditor.cs will be created. Notice that it derives from DotvvmMarkupControl which is required for all markup controls.
public class AddressEditor : DotvvmMarkupControl
{

}
Add code-behind file to a previously created markup control
If you've already created the control without the code-behind file, you can add it later.
Create the code-behind class and make it inherit from
DotvvmMarkupControl.Then, reference this class using the
@baseTypedirective:
@viewModel DotvvmDemo.Model.IAddress, DotvvmDemo
@baseType DotvvmDemo.Controls.AddressEditor, DotvvmDemo

...
Declare control properties
First, we will add two properties to the control.
The first property is called Title - it will be printed out inside the legend tag.
The second property is DisplayPhoneNumber property which will show or hide the Phone field.
The properties in a DotVVM control cannot be simple C# properties with default getter and setter - in order to support data-binding expressions, they need to be exposed as DotvvmProperty objects which contain metadata about the property and can store binding expressions.
DotVVM for Visual Studio adds an easy-to-use code snippet, which makes declaration of these properties simple.
To declare a DotVVM property, type dotprop and press Tab. The property declaration will be generated for you.
If you are using Resharper and type
dotprop, it will not see the code snippet and it will match theDotvvmPropertyclass instead. If this happens, press Escape before pressing Tab, and the snippet will work.
After you invoke the dotprop code snippet, you can change the name to Title, the type to string, the containing class to AddressEditor and the default value to "Address":
public string Title
{
    get { return (string)GetValue(TitleProperty); }
    set { SetValue(TitleProperty, value); }
}
public static readonly DotvvmProperty TitleProperty
        = DotvvmProperty.Register<string, AddressEditor>(c => c.Title, "Address");
The second property called DisplayPhoneNumber of type bool with default value true will look like this:
public bool DisplayPhoneNumber
{
    get { return (bool)GetValue(DisplayPhoneNumberProperty); }
    set { SetValue(DisplayPhoneNumberProperty, value); }
}
public static readonly DotvvmProperty DisplayPhoneNumberProperty
    = DotvvmProperty.Register<bool, AddressEditor>(c => c.DisplayPhoneNumber, true);
See the Control properties chapter for more information.
Access the properties from the control
Now, you can access the value of these properties using the {value: _control.Title} binding in the markup, just as properties defined using the @property directive.
Call methods in controls
To add custom logic in the markup control, we simply declare a method (e.g. ClearAddress) in the code behind file, and invoke it from a command:
<dot:Button Text="Clear address" Click="{command: _control.ClearAddress()}" />
The implementation in the code-behind class will look like this:
public void ClearAddress()
{
    var target = (IAddress)DataContext;
    target.Street = "";
    target.City = "";
    ...
}
Notice that we can access the binding context using the DataContext property. We can safely cast it to IAddress because the @viewModel directive of the control specifies that the binding context must implement this interface.
Logic in controls vs viewmodel
We recommend to put only simple logic in the markup controls. If you need to do something more sophisticated, place the logic in the viewmodel.
In the previous example, you can declare the ClearAddress method in the viewmodel, and call just {command: ClearAddress()}. In such case, the IAddress interface would have to declare this method, and all classes that implement the interface would have to implement also the ClearAddress method.
It is common for complex controls to ship with their own viewmodels - something like AddressEditorViewModel. Such viewmodel can be embedded in the page viewmodel, and it is easy to inject dependencies in these viewmodels (for example, to validate the ZIP codes or load the address from user profiles).
Practically speaking, viewmodels are able to store state and have async Load and PreRender method, allowing them to also load data.
Updating the viewmodel properties
The properties of markup controls do not store the value. They are only references to the value or the data-binding specified on the place where the control is used.
If you set a value of the Title property from the code-behind, the property will be updated, but it will not persist to the next postback.
You can use the this.SetValueToSource(MyProperty, newValue) method to attempt to write the newValue into the viewmodel.
If that is not possible (e.g. because there isn't a data binding), an exception will be thrown.
If you need to persist any state information in the markup control, it must be done by data-binding to some viewmodel property.
Imagine we have a NumericUpDown control which has one textbox and two buttons. The buttons increase or decrease the value of a number inside the textbox.
In the page, the control can be used like this:
<cc:NumericUpDown Value="{value: MyNumber}" />
The buttons in the control are using command bindings to call the _control.Up and _control.Down methods.
The Up method looks like this:
public void Up()
{
    SetValueToSource(ValueProperty, Value + 1);
}
The SetValueToSource will look up the property in the viewmodel (MyNumber) to which the Value property is bound, and will update its value accordingly.
If we were to call Value++ instead, we would evaluate the MyNumber binding, increment the number and then set the Value property to the resulting constant (instead of the binding).
Prior to DotVVM 4.0, the value in the viewmodel was updated just by calling the setter (which contains call to
SetValue). However, this was not reliable in some cases, and when the property was not bound to anything, calling this had no effect. That's why DotVVM 4.0 added the explicitSetValueToSourcemethod.