Add DotVVM to existing project
DotVVM is distributed as a NuGet package (DotVVM.Owin or DotVVM.AspNetCore) and can be used in existing ASP.NET or ASP.NET Core applications side by side with other frameworks.
You can find more information about modernizing .NET web applications in a book Modernizing .NET Web Applications by Tomas Herceg. One of the book's chapters is dedicated to DotVVM and shows the process of migrating ASP.NET Web Forms applications to the latest version of .NET.
Install & configure DotVVM using Visual Studio
Prerequisites
First, make sure you have the DotVVM for Visual Studio extension installed:
- Open the Extensions > Manage Extensions menu and type
DotVVMin the search box. - Click on the Install button.
- Restart Visual Studio so the extension can be installed.
If you cannot find the extension or if the extension reports errors when Visual Studio is started, make sure you have the latest updates of Visual Studio installed. The extension is sensitive to exact version of some Visual Studio assemblies, and it may not work properly with older releases. We recommend to check out the Release notes page to see which version of the extension is compatible with which build of Visual Studio. If you use preview versions of Visual Studio, always download the extension from the Release notes page.
ASP.NET Web Application Project or ASP.NET Core App
Open your ASP.NET or ASP.NET Core project. Make sure that all NuGet packages are restored and the project can be built.
If the project is using older version of .NET Framework than 4.7.2, upgrade the project to .NET Framework 4.7.2 or newer.
We recommend using the most current version of .NET Framework as the starting point.
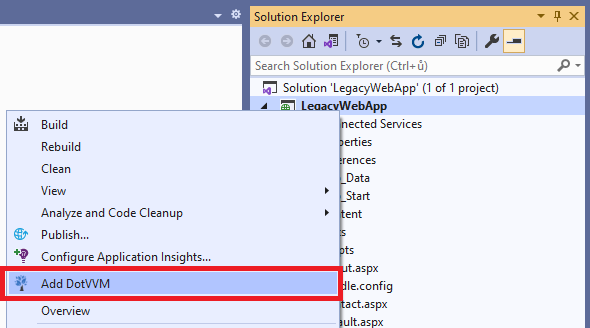
Once the project is buildable and running on .NET Framework 4.7.2 or newer, you can right-click on the project in the Solution Explorer window and choose Add DotVVM.

After the process finishes, you should be able to run the application without any changes. You can add new DotVVM pages in the project and make sure DotVVM runtime loads correctly.
There are some situations in which the process may fail. If it is the case, perform the following steps manually:
- Install
Microsoft.Owin.Host.SystemWebpackage. - Install
Dotvvm.OwinNuGet package. - Add the OWIN Startup Class
Startup.cs. - Add the DotVVM Configuration file
DotvvmStartup.cs. - Unload the project.
- Add the DotVVM project type GUID (
94EE71E2-EE2A-480B-8704-AF46D2E58D94) as the first semicolon-separated identifier in the<ProjectTypeGuids>element in the.csprojfile to make the DotVVM extension in Visual Studio work properly. - Reload the project.
See the Plan the modernization chapter for more information on how to plan the migration.
ASP.NET Web Site Project
DotVVM framework itself should run as part of a Web Site project, however the DotVVM for Visual Studio extension doesn't support Web Site projects and most of its features including IntelliSense will not work properly.
We recommend to convert the Web Site project to the Web Application first.
VB.NET support
DotVVM framework itself works with VB.NET, however the DotVVM for Visual Studio extension doesn't support Web Site projects and most of its features including IntelliSense will not work properly.
In such case, we recommend to create a DotVVM project aside of the VB.NET project and reference it from the VB.NET project. See VB.NET version of Web Forms modernization sample using DotVVM to see how to configure the projects to work together.
Install & configure DotVVM manually
ASP.NET Web Application
If you want to install DotVVM packages in an ASP.NET application manually, please follow the steps in the C# version of Web Forms modernization sample using DotVVM.
ASP.NET Core apps
To add DotVVM in an existing ASP.NET Core project manually, simply install DotVVM.AspNetCore Nuget package using Package Manager Console:
Install-Package DotVVM.AspNetCore
This command will also reference the dependent packages DotVVM and DotVVM.Core.
Initialization
To register DotVVM in the request pipeline, you have to do two things in the Startup class:
Add DotVVM services in the
IServiceCollectionobject.Add the DotVVM middlewares in the ASP.NET Core request pipeline.
Add the following lines in Program.cs or in the Configure/ConfigureServices method in Startup.cs if you use the older pattern of project startup:
// Program.cs
...
builder.Services.AddDotVVM<DotvvmStartup>();

...

app.UseDotVVM<DotvvmStartup>();
...
The config.Debug property is set automatically based on IHostingEnvironment.IsDevelopment().
Adding the DotvvmStartup class
Notice that the code references the DotvvmStartup class. It is a class you have to add in your project too.
This class contains the configuration of DotVVM itself, e.g. the registration of routes in your app.
using DotVVM.Framework;
using DotVVM.Framework.Configuration;
using DotVVM.Framework.ResourceManagement;
using DotVVM.Framework.Routing;

namespace DotvvmDemo
{
    public class DotvvmStartup : IDotvvmStartup, IDotvvmServiceConfigurator
    {
        public void Configure(DotvvmConfiguration config, string applicationPath)
        {
            // register your routes, controls and resources here
        }

        public void ConfigureServices(IDotvvmServiceCollection services)
        {
            services.AddDefaultTempStorages("Temp");
        }
    }
}