Running DotVVM with Mono on Raspberry PI: Build Your Own Weather Station
Published: 8/20/2016 8:11:00 PMRecently, Cristian Torras has shared a GitHub project with DotVVM application running on Raspberry PI on Mono. We were very excited by that because have tested DotVVM on Mono only once and it’s very long time ago. So we have decided to create a step-by-step guide and a sample DotVVM application which records and displays various weather data, and make sure that DotVVM runs even on Mono.
Hardware
If you want to build this, you’ll need a Raspberry PI (we have tested the app on Raspberry PI 3 Model B, and also on old Raspberry PI 1 Model B where it worked but it was quite slow because of low memory) and the BME280 sensor which measures temperature, air pressure and humidity (we bought the sensor on eBay for $4). Raspberry Pi 3 also needs the Micro SD Card, don’t buy the cheapest, make sure it is at least Class 10.
Operating System and Mono
We have used the Raspbian Jessie Lite, you just need download the image and write it on the SD card using Win32DiskImager.
After it’s done, insert the card in the Raspberry PI and plug the Ethernet, HDMI, USB keyboard and power cable in. The Raspberry will start booting. Make sure the Ethernet cable is connected to a functional router with DHCP enabled, so the Raspberry can obtain the IP address automatically and connect to the Internet.
When the OS launches, it prompts for username and password. The default combination is pi and raspberry.

Optional Step: Connect Using SSH
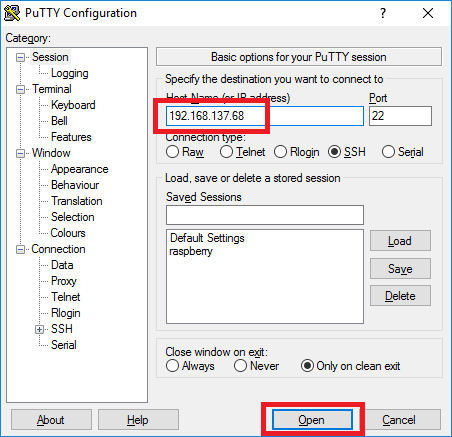
If you are uncomfortable using two screens and two keyboards, you can connect to the Raspberry from your computer using SSH. The easiest way is to download the Putty, which is a SSH client, and when you launch it, you just need to enter the IP address of the Raspberry.
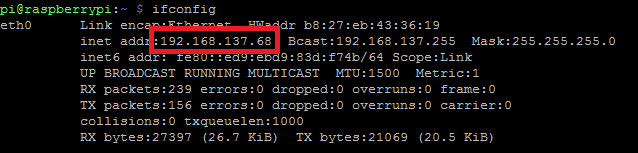
You can determine the IP address by typing the following command in the shell on the Raspberry:
ifconfig
Using this tool, you can remotely interact with the shell on your Raspberry. Since you can use the clipboard, it is much more convenient.
Installing Mono
The first thing you have to do is to install Mono. We’ll compile it from source codes because the version found in the apt-get repositories may be outdated.
Before we start, we need to install several tools that are required to build Mono. Type the following command to the shell and execute it (if you are using SSH, you can copy the line in the clipboard and paste it in the terminal window using right click):
sudo apt-get update
sudo apt-get install git autoconf libtool automake build-essential mono-devel gettext
It will take a few minutes. After the command finishes, we need to set a few variables – the PREFIX is the location where you want your Mono installed (typically /usr/local), the VERSION is the version of Mono and the ARCHIVEVERSION is the version of the archive on the Mono website (we’ll download the archive with the source codes, extract the files and compile the project).
Enter the following lines in the shell (one by one and make sure there are no errors in any of the steps):
PREFIX=/usr/local
VERSION=4.4.2
ARCHIVEVERSION=4.4.2.11
wget http://download.mono-project.com/sources/mono/mono-$ARCHIVEVERSION.tar.bz2
tar xvf mono-$ARCHIVEVERSION.tar.bz2
cd mono-$VERSION
./configure --prefix=$PREFIX
make
sudo make install
Now you should have Mono installed. To verify it’s there, you can type the following command which should output that the version 4.4.2 is installed.
mono –version
Communicating with the BME280 Temperature, Air Pressure and Humidity Sensor
The BME280 is a small sensor that can measure the temperature, pressure and humidity. It is easy to use and you have to connect it using 4 pins. Two of them are just powering the device, these are +3.3V (VIN) and GND. The others are used for transferring data. The BME280 uses the I2C protocol which allows to connect several low-speed devices with the microcontroller.
To communicate with the device from C#, we’ll use the Raspberry# IO library. They have a NuGet package, but the I2C assembly is not included in it, so you’ll have to clone the repository, open it in Visual Studio and build the solution yourself. After the build finishes, go to the Raspberry.IO.InterIntegratedCircuit\bin\Debug and grab all the DLLs. You’ll need to reference them in our DotVVM application to use the sensor.
Alternatively, you can use the DLLs from our sample project.
The communication with the BME280 is done using the following C# class. I have started with this one which is also for Raspberry PI, but for the Windows IoT Core, so I had to modify it to use the Raspberry Sharp classes instead of Windows built-in ones. Also, I have added the ReadHumidity function which was not there, because the original class was meant for BMP280 which doesn’t have the humidity sensor.
using System;
using System.Diagnostics;
using System.Threading;
using System.Threading.Tasks;
using Raspberry.IO.GeneralPurpose;
using Raspberry.IO.InterIntegratedCircuit;

namespace DotvvmWeather.Services
{
    public class BME280
    {
        //The BME280 register addresses according the the datasheet: http://www.adafruit.com/datasheets/BST-BME280-DS001-11.pdf
        const byte BME280_Address = 0x76;
        const byte BME280_Signature = 0x60;

        enum eRegisters : byte
        {
            BME280_REGISTER_DIG_T1 = 0x88,
            BME280_REGISTER_DIG_T2 = 0x8A,
            BME280_REGISTER_DIG_T3 = 0x8C,

            BME280_REGISTER_DIG_P1 = 0x8E,
            BME280_REGISTER_DIG_P2 = 0x90,
            BME280_REGISTER_DIG_P3 = 0x92,
            BME280_REGISTER_DIG_P4 = 0x94,
            BME280_REGISTER_DIG_P5 = 0x96,
            BME280_REGISTER_DIG_P6 = 0x98,
            BME280_REGISTER_DIG_P7 = 0x9A,
            BME280_REGISTER_DIG_P8 = 0x9C,
            BME280_REGISTER_DIG_P9 = 0x9E,

            BME280_REGISTER_DIG_H1_REG = 0xA1,
            BME280_REGISTER_DIG_H2_LSB = 0xE1,
            BME280_REGISTER_DIG_H2_MSB = 0xE2,
            BME280_REGISTER_DIG_H3_REG = 0xE3,
            BME280_REGISTER_DIG_H4_MSB = 0xE4,
            BME280_REGISTER_DIG_H4_LSB = 0xE5,
            BME280_REGISTER_DIG_H5_MSB = 0xE6,
            BME280_REGISTER_DIG_H5_LSB = 0xE5,
            BME280_REGISTER_DIG_H6_REG = 0xE7,

            BME280_REGISTER_CHIPID = 0xD0,
            BME280_REGISTER_VERSION = 0xD1,
            BME280_REGISTER_SOFTRESET = 0xE0,

            BME280_REGISTER_CAL26 = 0xE1,  // R calibration stored in 0xE1-0xF0

            BME280_REGISTER_CONTROLHUMID = 0xF2,
            BME280_REGISTER_CONTROL = 0xF4,
            BME280_REGISTER_CONFIG = 0xF5,

            BME280_REGISTER_PRESSUREDATA_MSB = 0xF7,
            BME280_REGISTER_PRESSUREDATA_LSB = 0xF8,
            BME280_REGISTER_PRESSUREDATA_XLSB = 0xF9, // bits <7:4>

            BME280_REGISTER_TEMPDATA_MSB = 0xFA,
            BME280_REGISTER_TEMPDATA_LSB = 0xFB,
            BME280_REGISTER_TEMPDATA_XLSB = 0xFC, // bits <7:4>

            BME280_REGISTER_HUMIDDATA_MSB = 0xFD,
            BME280_REGISTER_HUMIDDATA_LSB = 0xFE,
        };

        //String for the friendly name of the I2C bus
        const string I2CControllerName = "I2C1";
        //Create an I2C device
        private I2cDeviceConnection bme280 = null;
        //Create new calibration data for the sensor
        BME280CalibrationData CalibrationData;
        //Variable to check if device is initialized
        bool init = false;

        public bool Initialized
        {
            get { return this.init; }
        }

        //Method to initialize the BME280 sensor
        public void Initialize()
        {
            Debug.WriteLine("BME280::Initialize");

            try
            {
                var driver = new I2cDriver(ProcessorPin.Pin02, ProcessorPin.Pin03);
                bme280 = driver.Connect(BME280_Address);

                //Check if device was found
                if (bme280 == null)
                {
                    Debug.WriteLine("Device not found");
                }
                else
                {
                    try
                    {
                        //Make sure the I2C device is initialized
                        if (!init) Begin();
                    }
                    catch (Exception e)
                    {
                        init = false;
                        Debug.WriteLine("Exception: " + e.Message + "\n" + e.StackTrace);
                    }
                }
            }
            catch (Exception e)
            {
                Debug.WriteLine("Exception: " + e.Message + "\n" + e.StackTrace);
                throw;
            }

        }
        private void Begin()
        {
            Debug.WriteLine("BME280::Begin");
            byte[] writeBuffer = new byte[] { (byte)eRegisters.BME280_REGISTER_CHIPID };
            byte[] readBuffer = new byte[] { 0xFF };

            //Read the device signature
            WriteRead(writeBuffer, readBuffer);
            Debug.WriteLine("BME280 Signature: " + readBuffer[0].ToString());

            //Verify the device signature
            if (readBuffer[0] != BME280_Signature)
            {
                Debug.WriteLine("BME280::Begin Signature Mismatch.");
                return;
            }

            //Set the initalize variable to true
            init = true;

            //Read the coefficients table
            CalibrationData = ReadCoefficeints();

            //Write control register
            WriteControlRegister();

            //Write humidity control register
            WriteControlRegisterHumidity();
        }

        //Method to write 0x03 to the humidity control register
        private void WriteControlRegisterHumidity()
        {
            byte[] writeBuffer = new byte[] { (byte)eRegisters.BME280_REGISTER_CONTROLHUMID, 0x03 };
            bme280.Write(writeBuffer);
            Thread.Sleep(1);
            return;
        }

        //Method to write 0x3F to the control register
        private void WriteControlRegister()
        {
            byte[] writeBuffer = new byte[] { (byte)eRegisters.BME280_REGISTER_CONTROL, 0x3F };
            bme280.Write(writeBuffer);
            Thread.Sleep(1);
            return;
        }

        //Method to read a 16-bit value from a register and return it in little endian format
        private UInt16 ReadUInt16_LittleEndian(byte register)
        {
            UInt16 value = 0;
            byte[] writeBuffer = new byte[] { 0x00 };
            byte[] readBuffer = new byte[] { 0x00, 0x00 };

            writeBuffer[0] = register;

            WriteRead(writeBuffer, readBuffer);
            int h = readBuffer[1] << 8;
            int l = readBuffer[0];
            value = (UInt16)(h + l);
            return value;
        }

        private void WriteRead(byte[] writeBuffer, byte[] readBuffer)
        {
            bme280.Write(writeBuffer);
            for (var i = 0; i < readBuffer.Length; i++)
            {
                readBuffer[i] = bme280.ReadByte();
            }
        }

        //Method to read an 8-bit value from a register
        private byte ReadByte(byte register)
        {
            byte value = 0;
            byte[] writeBuffer = new byte[] { 0x00 };
            byte[] readBuffer = new byte[] { 0x00 };

            writeBuffer[0] = register;

            WriteRead(writeBuffer, readBuffer);
            value = readBuffer[0];
            return value;
        }

        //Method to read the caliberation data from the registers
        private BME280CalibrationData ReadCoefficeints()
        {
            // 16 bit calibration data is stored as Little Endian, the helper method will do the byte swap.
            CalibrationData = new BME280CalibrationData();

            // Read temperature calibration data
            CalibrationData.dig_T1 = ReadUInt16_LittleEndian((byte)eRegisters.BME280_REGISTER_DIG_T1);
            CalibrationData.dig_T2 = (Int16)ReadUInt16_LittleEndian((byte)eRegisters.BME280_REGISTER_DIG_T2);
            CalibrationData.dig_T3 = (Int16)ReadUInt16_LittleEndian((byte)eRegisters.BME280_REGISTER_DIG_T3);

            // Read presure calibration data
            CalibrationData.dig_P1 = ReadUInt16_LittleEndian((byte)eRegisters.BME280_REGISTER_DIG_P1);
            CalibrationData.dig_P2 = (Int16)ReadUInt16_LittleEndian((byte)eRegisters.BME280_REGISTER_DIG_P2);
            CalibrationData.dig_P3 = (Int16)ReadUInt16_LittleEndian((byte)eRegisters.BME280_REGISTER_DIG_P3);
            CalibrationData.dig_P4 = (Int16)ReadUInt16_LittleEndian((byte)eRegisters.BME280_REGISTER_DIG_P4);
            CalibrationData.dig_P5 = (Int16)ReadUInt16_LittleEndian((byte)eRegisters.BME280_REGISTER_DIG_P5);
            CalibrationData.dig_P6 = (Int16)ReadUInt16_LittleEndian((byte)eRegisters.BME280_REGISTER_DIG_P6);
            CalibrationData.dig_P7 = (Int16)ReadUInt16_LittleEndian((byte)eRegisters.BME280_REGISTER_DIG_P7);
            CalibrationData.dig_P8 = (Int16)ReadUInt16_LittleEndian((byte)eRegisters.BME280_REGISTER_DIG_P8);
            CalibrationData.dig_P9 = (Int16)ReadUInt16_LittleEndian((byte)eRegisters.BME280_REGISTER_DIG_P9);

            CalibrationData.dig_H1 = ReadByte((byte)eRegisters.BME280_REGISTER_DIG_H1_REG);
            CalibrationData.dig_H2 = (Int16)((ReadByte((byte)eRegisters.BME280_REGISTER_DIG_H2_MSB) << 8) | ReadByte((byte)eRegisters.BME280_REGISTER_DIG_H2_LSB));
            CalibrationData.dig_H3 = ReadByte((byte)eRegisters.BME280_REGISTER_DIG_H3_REG);
            CalibrationData.dig_H4 = (Int16)((ReadByte((byte)eRegisters.BME280_REGISTER_DIG_H4_MSB) << 4) | (ReadByte((byte)eRegisters.BME280_REGISTER_DIG_H4_LSB) & 0xF));
            CalibrationData.dig_H5 = (Int16)((ReadByte((byte)eRegisters.BME280_REGISTER_DIG_H5_MSB) << 4) | (ReadByte((byte)eRegisters.BME280_REGISTER_DIG_H5_LSB) >> 4));
            CalibrationData.dig_H6 = ReadByte((byte)eRegisters.BME280_REGISTER_DIG_H6_REG);

            Thread.Sleep(1);
            return CalibrationData;
        }


        //t_fine carries fine temperature as global value
        Int32 t_fine = Int32.MinValue;
        //Method to return the temperature in DegC. Resolution is 0.01 DegC. Output value of “5123” equals 51.23 DegC.
        private double BME280_compensate_T_double(Int32 adc_T)
        {
            double var1, var2, T;

            //The temperature is calculated using the compensation formula in the BME280 datasheet
            var1 = ((adc_T / 16384.0) - (CalibrationData.dig_T1 / 1024.0)) * CalibrationData.dig_T2;
            var2 = ((adc_T / 131072.0) - (CalibrationData.dig_T1 / 8192.0)) * CalibrationData.dig_T3;

            t_fine = (Int32)(var1 + var2);

            T = (var1 + var2) / 5120.0;
            return T;
        }


        //Method to returns the pressure in Pa, in Q24.8 format (24 integer bits and 8 fractional bits).
        //Output value of “24674867” represents 24674867/256 = 96386.2 Pa = 963.862 hPa
        private Int64 BME280_compensate_P_Int64(Int32 adc_P)
        {
            Int64 var1, var2, p;

            //The pressure is calculated using the compensation formula in the BME280 datasheet
            var1 = t_fine - 128000;
            var2 = var1 * var1 * (Int64)CalibrationData.dig_P6;
            var2 = var2 + ((var1 * (Int64)CalibrationData.dig_P5) << 17);
            var2 = var2 + ((Int64)CalibrationData.dig_P4 << 35);
            var1 = ((var1 * var1 * (Int64)CalibrationData.dig_P3) >> 8) + ((var1 * (Int64)CalibrationData.dig_P2) << 12);
            var1 = (((((Int64)1 << 47) + var1)) * (Int64)CalibrationData.dig_P1) >> 33;
            if (var1 == 0)
            {
                Debug.WriteLine("BME280_compensate_P_Int64 Jump out to avoid / 0");
                return 0; //Avoid exception caused by division by zero
            }
            //Perform calibration operations as per datasheet: http://www.adafruit.com/datasheets/BST-BME280-DS001-11.pdf
            p = 1048576 - adc_P;
            p = (((p << 31) - var2) * 3125) / var1;
            var1 = ((Int64)CalibrationData.dig_P9 * (p >> 13) * (p >> 13)) >> 25;
            var2 = ((Int64)CalibrationData.dig_P8 * p) >> 19;
            p = ((p + var1 + var2) >> 8) + ((Int64)CalibrationData.dig_P7 << 4);
            return p;
        }

        // Returns humidity in %RH as unsigned 32 bit integer in Q22.10 format (22 integer and 10 fractional bits).
        // Output value of “47445” represents 47445/1024 = 46.333 %RH
        private Int32 BME280_compensate_H_int32(Int32 adc_H)
        {
            Int32 v_x1_u32r;
            v_x1_u32r = (t_fine - ((Int32)76800));
            v_x1_u32r = (((((adc_H << 14) - (((Int32)CalibrationData.dig_H4) << 20) - (((Int32)CalibrationData.dig_H5) * v_x1_u32r)) +
            ((Int32)16384)) >> 15) * (((((((v_x1_u32r * ((Int32)CalibrationData.dig_H6)) >> 10) * (((v_x1_u32r *
            ((Int32)CalibrationData.dig_H3)) >> 11) + ((Int32)32768))) >> 10) + ((Int32)2097152)) *
            ((Int32)CalibrationData.dig_H2) + 8192) >> 14));
            v_x1_u32r = (v_x1_u32r - (((((v_x1_u32r >> 15) * (v_x1_u32r >> 15)) >> 7) * ((Int32)CalibrationData.dig_H1)) >> 4));
            v_x1_u32r = (v_x1_u32r < 0 ? 0 : v_x1_u32r);
            v_x1_u32r = (v_x1_u32r > 419430400 ? 419430400 : v_x1_u32r);
            return (Int32)(v_x1_u32r >> 12);
        }

        /*!
         * @brief Reads actual humidity from uncompensated humidity
         * @note returns the value in relative humidity (%rH)
         * @note Output value of "42.12" equals 42.12 %rH
         *
         *  @param v_uncom_humidity_s32 : value of uncompensated humidity
         *
         *
         *
         *  @return Return the actual humidity in floating point
         *
        */
        private double BME280_compensate_H_double(Int32 v_uncom_humidity_s32)
        {
            int BME280_INIT_VALUE = 0;
            int BME280_INVALID_DATA = 0;
            double var_h = BME280_INIT_VALUE;

            var_h = (((double)t_fine) - 76800.0);

            if (var_h != BME280_INIT_VALUE)
                var_h = (v_uncom_humidity_s32 - (((double)CalibrationData.dig_H4) * 64.0 +
                ((double)CalibrationData.dig_H5) / 16384.0 * var_h)) *
                (((double)CalibrationData.dig_H2) / 65536.0 *
                (1.0 + ((double)CalibrationData.dig_H6) / 67108864.0 * var_h *
                (1.0 + ((double)CalibrationData.dig_H3) / 67108864.0 * var_h)));
            else
                return BME280_INVALID_DATA;

            var_h = var_h * (1.0 - ((double)CalibrationData.dig_H1) * var_h / 524288.0);

            if (var_h > 100.0)
                var_h = 100.0;
            else if (var_h < 0.0)
                var_h = 0.0;

            return var_h;
        }

        public float ReadTemperature()
        {
            //Make sure the I2C device is initialized
            if (!init) Begin();

            //Read the MSB, LSB and bits 7:4 (XLSB) of the temperature from the BME280 registers
            byte tmsb = ReadByte((byte)eRegisters.BME280_REGISTER_TEMPDATA_MSB);
            byte tlsb = ReadByte((byte)eRegisters.BME280_REGISTER_TEMPDATA_LSB);
            byte txlsb = ReadByte((byte)eRegisters.BME280_REGISTER_TEMPDATA_XLSB); // bits 7:4

            //Combine the values into a 32-bit integer
            Int32 t = (tmsb << 12) + (tlsb << 4) + (txlsb >> 4);

            //Convert the raw value to the temperature in degC
            double temp = BME280_compensate_T_double(t);

            //Return the temperature as a float value
            return (float)temp;
        }

        public float ReadPreasure()
        {
            //Make sure the I2C device is initialized
            if (!init) Begin();

            //Read the temperature first to load the t_fine value for compensation
            if (t_fine == Int32.MinValue)
            {
                ReadTemperature();
            }

            //Read the MSB, LSB and bits 7:4 (XLSB) of the pressure from the BME280 registers
            byte tmsb = ReadByte((byte)eRegisters.BME280_REGISTER_PRESSUREDATA_MSB);
            byte tlsb = ReadByte((byte)eRegisters.BME280_REGISTER_PRESSUREDATA_LSB);
            byte txlsb = ReadByte((byte)eRegisters.BME280_REGISTER_PRESSUREDATA_XLSB); // bits 7:4

            //Combine the values into a 32-bit integer
            Int32 t = (tmsb << 12) + (tlsb << 4) + (txlsb >> 4);

            //Convert the raw value to the pressure in Pa
            Int64 pres = BME280_compensate_P_Int64(t);

            //Return the temperature as a float value
            return ((float)pres) / 256 / 100;
        }

        //Method to take the sea level pressure in Hectopascals(hPa) as a parameter and calculate the altitude using current pressure.
        public float ReadAltitude(float seaLevel)
        {
            //Make sure the I2C device is initialized
            if (!init) Begin();

            //Read the pressure first
            float pressure = ReadPreasure();
            //Convert the pressure to Hectopascals(hPa)
            pressure /= 100;

            //Calculate and return the altitude using the international barometric formula
            return 44330.0f * (1.0f - (float)Math.Pow((pressure / seaLevel), 0.1903f));
        }

        public float ReadHumidity()
        {
            //Make sure the I2C device is initialized
            if (!init) Begin();

            //Read the temperature first to load the t_fine value for compensation
            if (t_fine == Int32.MinValue)
            {
                ReadTemperature();
            }

            //Read the MSB and LSB of the humidity from the BME280 registers
            byte hmsb = ReadByte((byte)eRegisters.BME280_REGISTER_HUMIDDATA_MSB);
            byte hlsb = ReadByte((byte)eRegisters.BME280_REGISTER_HUMIDDATA_LSB);

            //Combine the values into a 32-bit integer
            Int32 h = (hmsb << 8) + hlsb;

            //Convert the raw value to the humidity in %
            double humidity = BME280_compensate_H_double(h);

            //Return the humidity as a float value
            return ((float)humidity);
        }
    }
}
You can work with the sensor this way:
var bme280 = new BME280();
bme280.Initialize();

var data = new WeatherData()
{
    Date = DateTime.Now,
    Temperature = bme280.ReadTemperature(),
    Pressure = bme280.ReadPreasure(),
    Humidity = bme280.ReadHumidity()
};
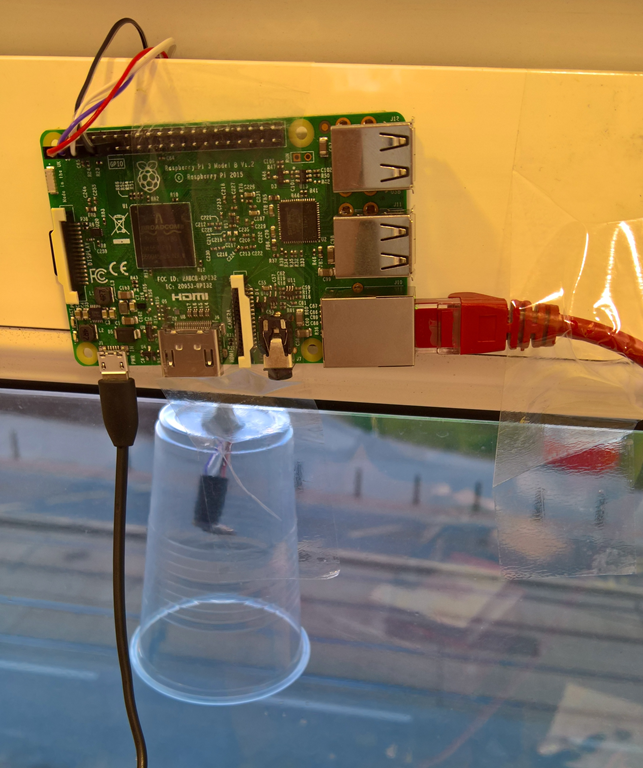
Wiring Up the BME280 Sensor
The connection depends on the version of your Raspberry PI. Search for the pin layout for your actual model and connect the wires using the following table:
| Raspberry | BME280 |
| 3.3V (PIN 1) | VIN |
| GND (e.g. PIN 9) | GND |
| GPIO 2 (PIN 3) | SDA |
| GPIO 3 (PIN 5) | SCL |
You can find the layout for Raspberry PI 2B and 3B on this page. Be careful – there are two numberings of the PINs:
- Physical numbering (bottom line from left to right is PIN 1, PIN 3, PIN 5… and the top line from left to right is PIN 2, PIN 4…). In the table above, the physical PIN numbers are in parentheses. 
Picture comes from https://www.raspberrypi.org/documentation/usage/gpio-plus-and-raspi2/
- GPIO numbering (PIN numbers as the processor sees them)

Picture comes from https://www.raspberrypi.org/documentation/usage/gpio-plus-and-raspi2/
When you connect the sensor to the Raspberry PI, it may not work because the Raspberry has I2C disabled by default. You need to do the following steps to enable it. Type the following command in the shell:
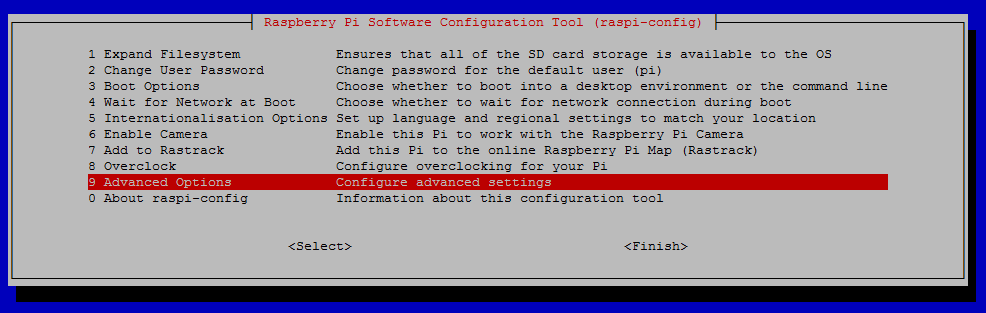
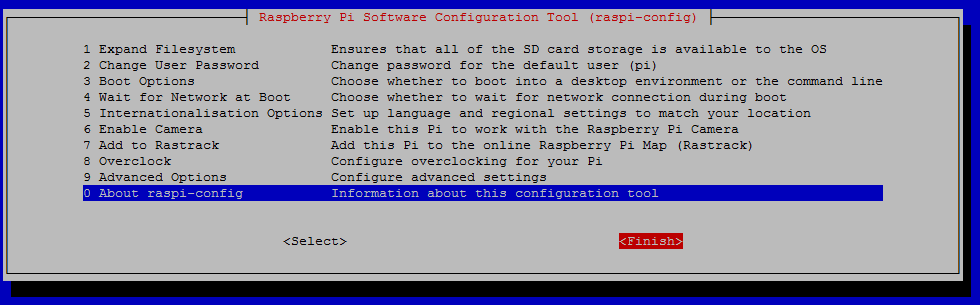
sudo raspi-config
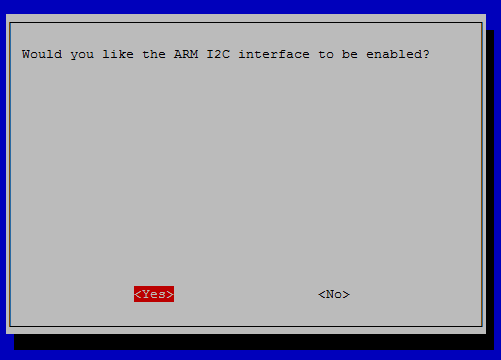
It launches the Raspberry PI configuration utility. Choose Advanced Options and I2C.
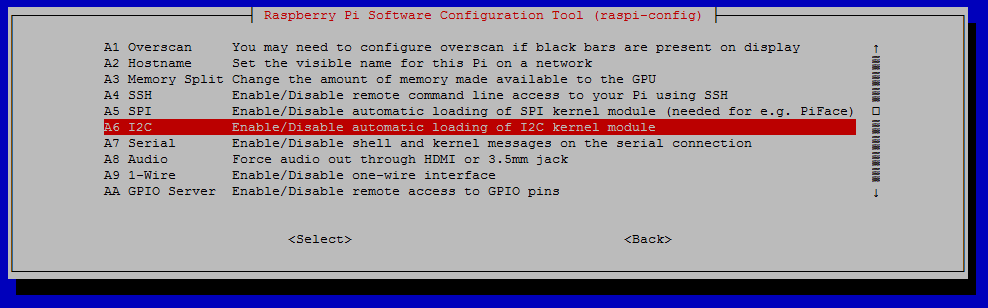
In the next dialog window, choose Yes and then Finish the wizard.
Now, type the following command in the shell. It installs the useful i2cdetect utility, which you can use to check that you have wired the sensor correctly.
sudo apt-get install python-smbus
When the utility is installed, run the following command. It should output a table with connected devices. Each device has its own address, the BME280 sensor should be on the address 0x76. This address is passed to the I2cDevice constructor in the BME280 class listed above.
i2cdetect –y 1
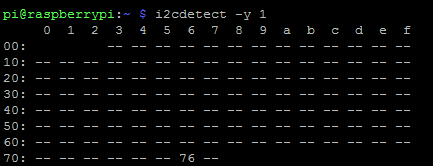
If you can’t see the number 76, make sure you have wired up the sensor correctly. Now we can start coding.
On older devices, the Raspberry may need to be rebooted and sometimes, the configuration files are not adjusted correctly. If the i2cdetect says that it cannot open the file /dev/i2c-1, follow the manual installation instructions.
Creating a DotVVM App for Raspberry PI
Now the hardware is ready and we can start coding. The default DotVVM Project template in the Visual Studio assumes that you’ll host your application on IIS. On Raspberry, we’ll need a console application which will self-host the OWIN infrastructure and run DotVVM on top of it.
1. Create and empty DotVVM Project.
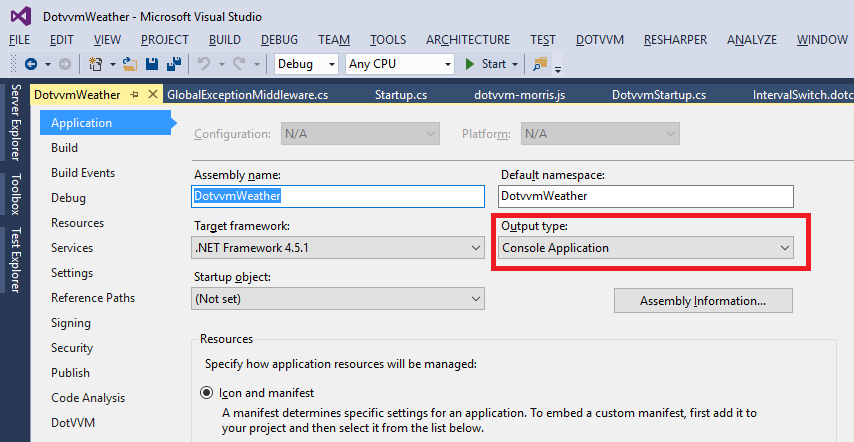
2. Right-click the project in the Solution Explorer window and choose Properties.
3. On the first tab, change the output type to the Console Application.
4. Right-click the project in the Solution Explorer window and click on Unload Project. Then, right-click the project again and click Edit *.csproj.
5. We need to tell the Visual Studio that this project is not a web application. Find the line starting with <ProjectTypeGuids> and remove the Guid in the middle. The line should look like this:
<ProjectTypeGuids>{94EE71E2-EE2A-480B-8704-AF46D2E58D94};{fae04ec0-301f-11d3-bf4b-00c04f79efbc}</ProjectTypeGuids>
6. Save the file, right-click on the project in the Solution Explorer window and choose Reload Project.
7. Now we need to add the libraries which supports OWIN self-hosting. Install the following NuGet packages in the project (either type the following commands in the Package Manager Console, or right-click the project, choose Manage NuGet Packages, find and install them).
Install-Package Microsoft.Owin.Host.HttpListener
Install-Package Microsoft.Owin.Hosting
8. Exit the Visual Studio and run it again with the Administrator privileges (right-click on the VS icon and choose Run as Administrator).
9. Add the Program.cs file to the project. The console application needs the Main method, and we’ll start the OWIN host there.
using System;
using System.Collections.Generic;
using System.Threading;
using System.Web;
using DotvvmWeather.Services;
using Microsoft.Owin.Hosting;

namespace DotvvmWeather
{
    public class Program
    {
        public static void Main(string[] args)
        {
            // start the OWIN host
            try
            {
                var baseUrl = "http://*:60000";
                using (WebApp.Start<Startup>(baseUrl))
                {
                    Console.WriteLine($"DotVVM Self-Host running on {baseUrl}");
                    Console.WriteLine("Press X to quit...");
                    ConsoleKeyInfo c;
                    do
                    {
                        c = Console.ReadKey();
                    }
                    while (c.KeyChar != 'x' && c.KeyChar != 'X');
                    Console.WriteLine();
                }
            }
            catch (Exception ex)
            {
                Console.WriteLine("Error running server: " + ex.Message);
            }
        }
    }
}
10. Also, in the self-hosted version we have to adjust the Startup.cs class.
using System;
using System.IO;
using System.Threading.Tasks;
using Microsoft.Owin;
using Microsoft.Owin.FileSystems;
using Microsoft.Owin.StaticFiles;
using Owin;
using DotVVM.Framework.Hosting;
using Microsoft.Owin.Security.DataProtection;

[assembly: OwinStartup(typeof(DotvvmWeather.Startup))]
namespace DotvvmWeather
{
    public class Startup
    {
        public void Configuration(IAppBuilder appBuilder)
        {
            appBuilder.SetDataProtectionProvider(new MonoDataProtectionProvider());

            appBuilder.Use<GlobalExceptionMiddleware>();

            // DotVVM initialization
            var applicationPhysicalPath = Directory.GetCurrentDirectory();
            var dotvvmConfiguration = appBuilder.UseDotVVM<DotvvmStartup>(applicationPhysicalPath);

            // serve static files from the filesystem folders
            appBuilder.UseFileServer(new FileServerOptions()
            {
                RequestPath = new PathString("/Scripts"),
                FileSystem = new PhysicalFileSystem(@"./Scripts")
            });

            appBuilder.UseFileServer(new FileServerOptions()
            {
                RequestPath = new PathString("/fonts"),
                FileSystem = new PhysicalFileSystem(@"./fonts"),
            });

            appBuilder.UseFileServer(new FileServerOptions()
            {
                RequestPath = new PathString("/Content"),
                FileSystem = new PhysicalFileSystem(@"./Content"),
            });
        }
    }
}
11. You’ll also need to implement a global exception middleware (so the application won’t end when some request throws an exception) and the DataProtectionProvider (because self-hosted OWIN doesn’t have the default one).
using System;
using System.Reflection;
using System.Threading.Tasks;
using Microsoft.Owin;
using Microsoft.Owin.Security.DataProtection;

namespace DotvvmWeather
{
	public class GlobalExceptionMiddleware : OwinMiddleware
    {
        public GlobalExceptionMiddleware(OwinMiddleware next) : base(next)
        {
        }

        public override async Task Invoke(IOwinContext context)
        {
            try
            {
                await Next.Invoke(context);
            }
            catch (Exception ex)
            {
                Console.WriteLine("HTTP Request Exception: " + ex.ToString());
            }
        }
    }

    public class MonoDataProtectionProvider : IDataProtectionProvider
    {
        private string appName;

        public MonoDataProtectionProvider() : this(Assembly.GetExecutingAssembly().GetName().Name)
        {
        }

        public MonoDataProtectionProvider(string appName)
        {
            if (appName == null)
            {
                throw new ArgumentNullException("appName");
            }
            this.appName = appName;
        }

        public IDataProtector Create(params string[] purposes)
        {
            return new MonoDataProtector(appName, purposes);
        }
    }

    public class MonoDataProtector : IDataProtector
    {
        private const string PRIMARY_PURPOSE = "Microsoft.Owin.Security.IDataProtector";

        private readonly string appName;
        private readonly DataProtectionScope dataProtectionScope;
        private readonly string[] purposes;

        public MonoDataProtector(string appName, string[] purposes = null)
        {
            if (appName == null) { throw new ArgumentNullException("appName"); }
            if (purposes == null)
            {
                purposes = new[] { PRIMARY_PURPOSE };
            }

            this.appName = appName;
            this.purposes = purposes;
            this.dataProtectionScope = DataProtectionScope.CurrentUser;
        }

        public byte[] Protect(byte[] userData)
        {
            return ProtectedData.Protect(userData, this.GetEntropy(), dataProtectionScope);
        }

        public byte[] Unprotect(byte[] protectedData)
        {
            return ProtectedData.Unprotect(protectedData, this.GetEntropy(), dataProtectionScope);
        }

        private byte[] GetEntropy()
        {
            using (SHA256 sha256 = SHA256.Create())
            {
                using (MemoryStream memoryStream = new MemoryStream())
                using (CryptoStream cryptoStream = new CryptoStream(memoryStream, sha256, CryptoStreamMode.Write))
                using (StreamWriter writer = new StreamWriter(cryptoStream))
                {
                    writer.Write(this.appName);
                    writer.Write(PRIMARY_PURPOSE);

                    foreach (string purpose in this.purposes)
                    {
                        writer.Write(purpose);
                    }
                }

                return sha256.Hash;
            }
        }
    }
}
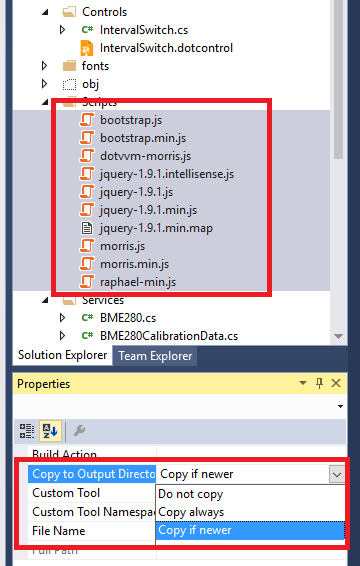
12. The last thing you need to do, is to make sure, that all files required by the application (scripts, styles, fonts, and also all DotVVM markup files – views, master pages and controls) will be copied to the bin directory so when you run the console application, it will find the files in its directory.
You need to select all these files in the Solution Explorer and in the Properties window, set the Copy to Output Directory to Copy if newer.
13. Next, rename the web.config file to app.config and remove the web.Debug.config and web.Release.config files - we don’t need them anymore.
14. Be careful about file paths. On Linux, file and directory names are case sensitive, and the path separator is forward slash (/) instead of backslash (\). It is very reasonable to use the Path.Combine, Path.GetDirectoryName and similar functions to make sure you treat the file system paths correctly.
15. Now you can build your DotVVM application, implement the views, viewmodels and the logic. When you build the project, all the files required by the application will be in the bin folder which you just need to copy on the Raspberry.
Deploying the Application to Raspberry PI
One of the options which is quite convenient, is to install the FTP server on the Raspberry and point it in your home directory. Then, you’ll be able to connect to that folder from Windows Explorer and copy the files.
To install the FTP server, type the following commands in the terminal. The first line will install the FTP server, the second one opens the config file in the text editor so we can configure the server.
sudo apt-get install vsftpd
sudo nano /etc/vsftpd.conf
In the text editor, do the following changes:
1. Uncomment the Write_enable option (remove the leading #).
2. Press Ctrl-O, Enter and then Ctrl-X.
Then, type the following command in the shell to restart the server:
sudo /etc/init.d/vsftpd restart
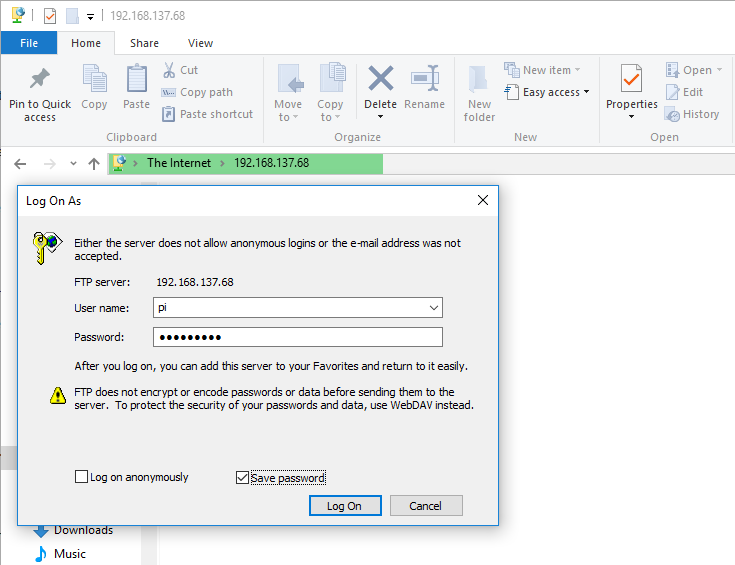
Now, in Windows Explorer, you can enter the ftp://your_raspberry_ip_address/ in the address bar and use pi / raspberry as the credentials.
When you connect to the FTP, it points to your home directory. You’ll see the mono-4.4.2 folder and the mono-4.4.2.11.tar.gz archive we have downloaded.
Create a new directory and copy the contents of the bin folder from your project into this directory. Then, in the shell, type the following command to run the application (make sure you run cd directoryName first):
sudo mono YourAppName.exe
After few seconds, the DotVVM host starts and you can open the browser and the application will run on http://your_raspberry_ip_address:60000/.
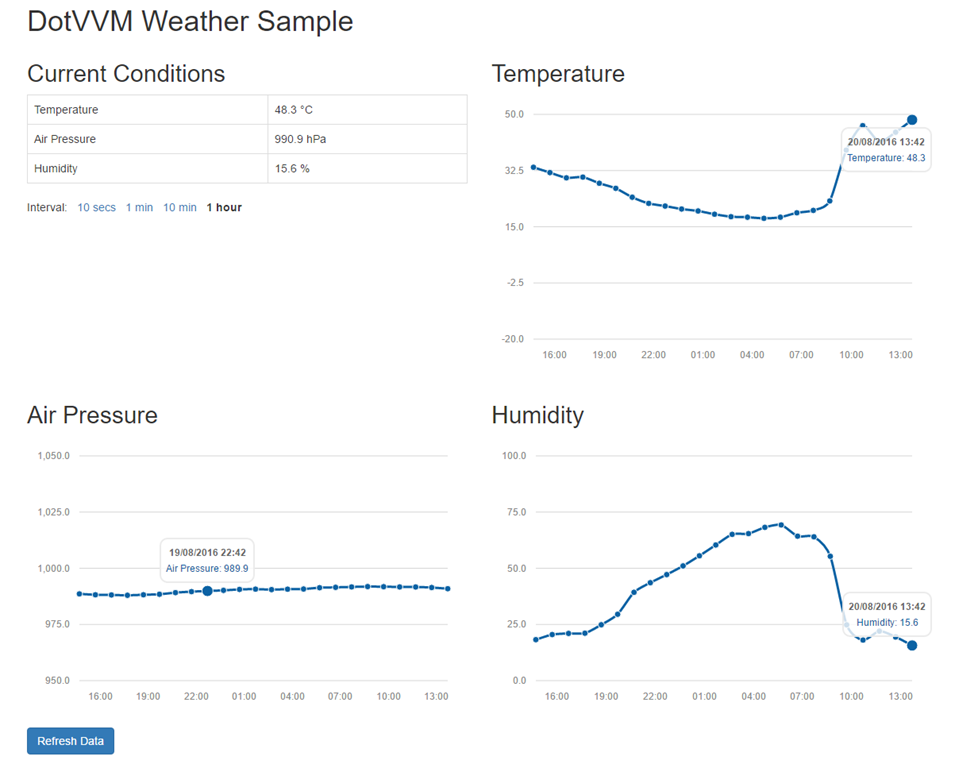
DotVVM Weather Sample
You can find our sample Weather application which uses the BME280 sensor to display and record the temperature, air pressure and humidity data, on GitHub.
The application reads the weather data every 10 seconds and stores them. The application has only one web page which displays the current weather conditions and charts with the history data.
To store the weather data, we use a binary file. Each measurement takes exactly 20 bytes (8 bytes for date, 4 bytes for temperature, 4 bytes for pressure and 4 bytes for humidity). Since the length of the record is constant, we don’t have to read the whole file – we can read only last few kilobytes to get the data for the charts no matter how big the file is.
We are thrilled about using DotVVM in IoT scenarios. Please let us know about your IoT projects with DotVVM and Mono!

I am the CEO of RIGANTI, a small software development company located in Prague, Czech Republic.
I am Microsoft Most Valuable Professional and the founder of DotVVM project.